


Top 5 Logical macOS Settings & Features to Make Your Mac Experience Effortlessly Efficient
Enhance the User Experience on your Mac with these five simple settings and features


No matter how long you have been using a Mac, there are always a few hacks that will always surprise you because of Apple’s intuitive way of designing their products and services. I am not promising you any groundbreaking hacks today but rather just five simple settings and features, as alternatives, you need to take advantage of on your Mac.
The way we use our Macs is very personal and so we tend to just stick to the status quo and let it grow on us even if we don’t like them. But there are logical reasons to changing some of these settings that could help you become more efficient or rather make your daily tasks more effortless than before. In today’s story, I want to share that logic with you and let you decide if those settings are worth changing. Check out the PRO TIP at the end of every setting/feature mentioned for a more nuanced final setup.
Let’s begin!
Just a quick detour… if you like such kind of tech stories, consider signing up for my email newsletter. The perks include a higher motivation on my end to deliver such interesting stories more frequently 😇
Subscribe to Aditya's Tech Newsletter!
Subscribe to Aditya's Tech Newsletter! Hey there! If you are interested in getting stories from the 🧑💻Tech space…adityadarekar.medium.com
Dock Positioning: On Your Left, Captain!
By default, the dock is positioned at the bottom of the desktop in macOS. But it shouldn’t be that way.

I love keeping the dock to the left because it has made a significant difference in the way I use it. With the dock on the height of the MacBook’s display, I have to hover the cursor over the dock for a lesser time with minimal movement on the trackpad, to get to the app I want to open. If you are using an external monitor with a display greater than 20”, then you should try positioning the dock to the left.


But do those milliseconds even count? I believe it does. Back in college, I took a course called ‘Human-Computer Interface’ which taught me a lot about UI & UX design — how every millisecond of the user exploring an interface counts because it cumulatively adds up. And you always want it to add up to a good experience.

PRO TIP: Once you get used to the dock positioned on the left, your cursor will travel more along the height of the screen, which is shorter than the width. This is great because you can now set up hot corners on the bottom left and top left of the screen. You can also position frequently used apps to the bottom of the dock (nearer to the trash) so you can get to them easily.
Aliases a.k.a the Allies of your Mac’s SSD
If you love your Mac storage too much and consider it to be precious or are simply low on it then you should know about aliases.
Creating an alias of a folder containing files would be similar to having a shortcut in Windows — it would appear at the original location for just the namesake but its content would take up storage elsewhere. And if you have a folder that you keep repopulating with heavy data files then it would be best to create an alias of that folder and store it on an external drive.
The best way to create an alias is using a terminal command. Here’s an example:
ln -s ~/Volumes/Final_Destination /Documents/Original_Destination

In case the original folder has files within it, you can either:

1. Copy them by using:
cp -R ~/Documents/Original_Destination /Volumes/Final_Destination

2. Delete the folder contents by using:
rm -rf ~/Documents/Original_Destination
Having done this, the contents would be moved to the desired location leaving only an alias in its original location. Henceforth, all files downloaded to this folder will only appear in the location you set the alias to.

PRO TIP: Manual iPhone Backups through the Finder (earlier, iTunes) take up a lot of space on the Mac. I created an alias for the backup folder and directed it to my hard drive. Now every time I do a backup of my iPhone, it gets stored on the hard drive without me having to manually relocate them whenever I run out of storage on the Mac. You could do this for the Photos & Videos folder too if they tend to take up a lot of space.
Finder Tags and Smart Folders: The Sherlock of macOS
Perhaps the most underutilized features in macOS are those within Finder. We could keep talking about them for hours because there are just so many things possible. Let’s talk about two of them first.
Think of Finder Tags as having passive categorization. They are good for labeling your files and folders similar to marking emails with a certain flag within Apple Mail. They make finding certain files easier. I like to tag my official documents (Passport & other ID Cards) in red because they display that sense of urgency whenever I open Finder to find them. Similarly, school time files that include assignments and presentations are labeled yellow. You can even rename these tags so they are easily searachable later.

I called Finder Tags passive because they require you to manually categorize the files while tagging them. You can either base these tags on the sense of urgency the colors evoke (like I did) or even chronologically i.e. time-based. Also a single file or folder can have more than one tag.
Smart Folder, on the other hand, supports active categorization in the sense that they are more smart and hence active agents in helping you categorize your files, unlike the tags. They are updating automatically. To create a Smart Folder when the Finder is open, choose File >> New Smart Folder from the menu bar. You then get to set your criteria(s) for what kind of data you want to see in that folder and this folder being smart will make sure that all future files also find a place in this folder if they match the criteria rules you set.

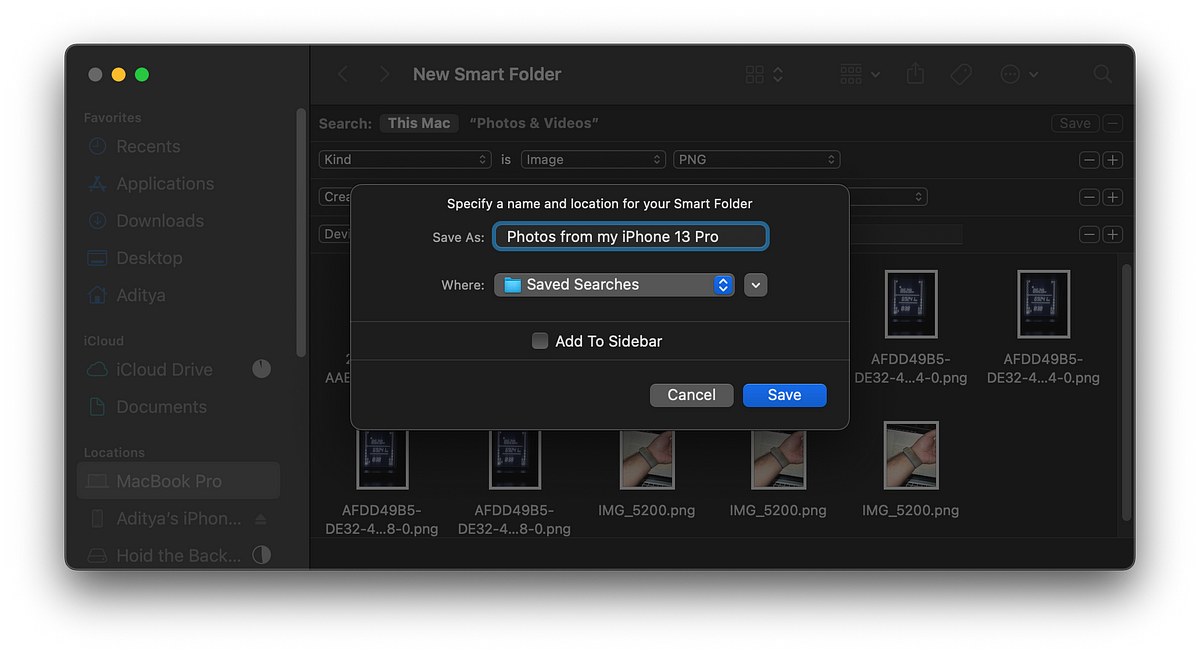
I use this to categorize pictures based on their file format and even device model(s) instead of using the search field to find them and then move them. Smart Folder reduces a lot of unnecessary searches and relocating if you know for sure what you want.
PRO TIP: You can create Smart Folders to identify and classify files based on their data within. Say, you have a Word document using a certain type of word like “iPhone” or “Mac” then you can classify them all in an “Apple” Smart Folder.
If you are enjoying this story till now, do leave some claps 👏👏👏 And if those 50 claps fall short of the appreciation, then here’s my newsletter 📧that you could sign up to:
Subscribe to Aditya's Tech Newsletter!
Subscribe to Aditya's Tech Newsletter! Hey there! If you are interested in getting stories from the 🧑💻Tech space…adityadarekar.medium.com
Keep reading with a 7-day free trial
Subscribe to Aditya’s Substack to keep reading this post and get 7 days of free access to the full post archives.